Note: As an Amazon Associate I earn from qualifying purchases.
Trying out the HAIHUANG DIY Test Bench Case (Aluminum MATX Open Chassis) (2024)

Introduction
I recently had the chance, at the office, to build a PC using the HAIHUANG DIY Test Bench Case. I quite enjoy assembling PCs and was intrigued by this open chassis. It seemed like the perfect opportunity to test out a case that prioritizes easy access to components and cooling efficiency.
Specifications
| Property | Value | Property | Value |
|---|---|---|---|
| Brand | HAIHUANG | Motherboard Compatability | Micro ATX |
| Color | MATX | Material | Aluminum |
| Cooling Method | Water | Hard Disk Form Factor | 3.5 Inches |
| Fan Count | 2 |
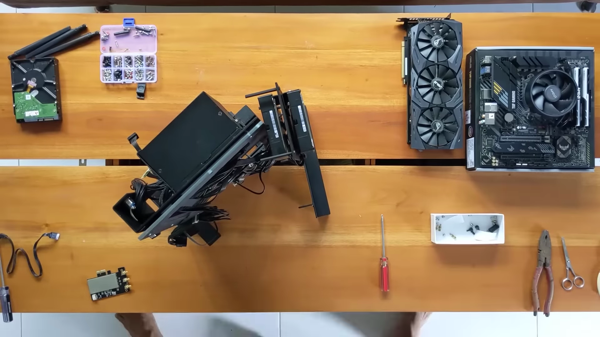
Photos
Click on photos to enlarge them:


Prices
Check prices of the HAIHUANG DIY Test Bench Case Rack on:
Design Philosophy and Customizability of the Open Chassis

Designing a PC build requires a balance between aesthetics, functionality, and personal style. When I got my hands on the HAIHUANG DIY Test Bench Case, I was looking for something that combined all these aspects, and I must say, it’s a unique take on computer chassis design.
The open chassis concept caught my eye for several reasons:
Customizability: Anything that allows you to tweak, adjust, and reposition parts to fit your specific needs gets a thumbs up.
Heat Dissipation: With no restrictive panels, the hardware stays cool, lowering the risk of thermal throttling.
Accessibility: Easy access to components is a dream for enthusiasts who love to upgrade and troubleshoot without the constriction of traditional cases.
Despite the advantages, one cannot overlook a few drawbacks:
Exposure to Dust: An open design inevitably attracts dust, which means regular cleaning is a must.
Durability: Without protective panels, components are more susceptible to accidents or spills.
Crafting a PC in this DIY case feels like a melding of tech and Tetris. It’s a fun challenge to figure out the best layout for my components. The case’s ability to support various motherboard sizes, from ITX to EATX, is an impressive feature that speaks to its versatility.
The aluminum structure of the chassis offers a mix of lightweight yet robust support for heavyweight components like a high-end graphics card. The inclusion of the option to mount the GPU vertically with an additional extension cable is a nice touch, catering to those who want to showcase their cards or simply change up the airflow.
Yet, even with its strengths, it’s not all plain sailing. The self-assembly nature can be daunting; it’s not for the faint-hearted or those short on time. Mistakes can be made during setup, especially with motherboard standoffs, which I found required some trial and error to get right.
The case’s modularity had me thinking outside of the box, quite literally. It feels like you have a canvas to build your PC the way you want it. You can rearrange components to accommodate custom cooling solutions or fit in unusually sized hardware that might be a squeeze in a standard case.
With a design philosophy that emphasizes individual expression through building one’s computer, HAIHUANG’s DIY Test Bench is a compelling pick for PC builders who revel in the process of assembly and optimization. It’s perfect for showcasing builds, testing new components, or simply enjoying a unique and personalized computer setup. Despite its open design potentially inviting more maintenance, the trade-offs are well worth the benefits for any enthusiast excited by hands-on customization.
Assembly Experience and Build Quality

Assembling the HAIHUANG DIY Test Bench Case was a bit of a mixed bag. On one hand, the freedom to create nearly any configuration and easily access components is fantastic, but on the other hand, it can be a test of patience—like working through a challenging puzzle.
Here’s a quick rundown of my assembly experience:
Time Commitment: Set aside at least an hour, especially if you meticulously plan out your build.
Tools & Parts: A major plus is that all necessary tools and an abundance of extra screws and bits are provided—no need for a hardware store run.
Instructions: They’re decent, with a reliance on pictures. Some steps can be unclear, and expect some trial and error with standoff placements.
Build Quality: The aluminum frame is lightweight yet sturdy, although the anodizing could be more scratch-resistant.
Standoffs: Aligning them correctly can be a fiddly process. Be sure to double-check before securing your motherboard.
Working with T-slot aluminum makes the assembly process customizable, and while this ‘Lego for adults’ approach can be fun for those with a DIY spirit, it might be overwhelming for beginners or the less technically inclined. I found aligning the motherboard standoffs properly was a little finicky, and plastic shavings from the extrusions could be a concern—be sure to wipe these down to prevent any electrical shorts.
Despite these hurdles, once assembled, the test bench is unexpectedly solid. There’s a genuine satisfaction in seeing your components laid out on something you’ve put together with your own hands. The PCIe bracket was one potential flaw—it felt somewhat weak and flimsy, raising concerns about the vertical mounting of heavier GPUs.
In terms of versatility, the ability to switch between layouts or adjust the frame for different components without much hassle is a huge advantage. Need to move around the PSU or tweak the AIO radiator mount? No problem. And let’s talk about the cooling potential—with everything open to the air, your components can truly breathe.
All things considered, this case is a builder’s playground. If you enjoy hands-on projects and don’t mind spending time on setup, the HAIHUANG DIY Test Bench offers a rewarding building experience and admirable build quality for its price point. Just be prepared for some assembly quirks along the way.
Performance and Cooling Efficiency

When I first got my hands on the HAIHUANG DIY Test Bench Case, I immediately thought about how the open chassis design would affect performance, particularly in terms of cooling efficiency. Here are my initial impressions:
Improved Airflow: Without the constraints of a closed case, air naturally flows over all the components, which definitely helps with cooling.
Ease of Custom Cooling Solutions: The open space makes it much simpler to install custom water cooling setups or oversized air coolers that wouldn’t fit in a traditional case.
Heat Dissipation: The aluminium structure of the case is also conducive to heat dissipation, contributing to overall cooler component temperatures.
However, this design isn’t without its drawbacks:
Dust Accumulation: Without the enclosure of a traditional case, there’s nothing to stop dust from settling on components, which may require frequent cleaning.
Potential for Accidental Damage: The openness also means components are more exposed to accidental knocks or spills.
In terms of performance and cooling, I specifically noticed that my GPU and CPU temperatures were lower by a good margin in comparison to a traditional case. This was a major plus as it could potentially mean an extension of my components’ lifespans and stability, especially under load during gaming or intense processing tasks. There’s something to be said for the ease with which heat rises away from the hardware in this open structure. Yet, this also means that a strategically placed fan or two might be necessary to direct that air flow, especially in a dust-prone environment.
I found that my power supply (PSU) also benefited from this set-up, running cooler and quieter than in my previous closed case scenario. To ensure I was optimizing this, I took extra steps to manage the cable placements to ensure unobstructed airflow.
Regarding the downside, the need to regularly dust off the components and the vulnerability to accidental damage can’t be overlooked. My solution was to place the rig in an area with minimal foot traffic and to be mindful of the exposure when handling liquids or cleaning around it.
On a personal note, I enjoyed the DIY aspect and the innate potential for optimizing performance through tinkering. While the open chassis design might not be everyone’s cup of tea, for enthusiasts who prioritize performance, this test bench could serve as a game-changer. Just be prepared to account for the additional maintenance and protective measures necessitated by the open design.
Versatility and Compatibility with Various Components

When it comes to building a PC test bench, I’m the type who loves having my hands on various components to see how they perform in different configurations. The HAIHUANG DIY Test Bench Case piqued my interest because it promises a level of versatility and compatibility with a variety of motherboards and cooling solutions. Here’s a breakdown:
EATX, ATX, MATX, ITX motherboard support: This is a huge plus. I didn’t have to worry about my motherboard’s form factor. Whether you’re dealing with a beefy EATX or a compact ITX, this case can handle it.
Good compatibility with cooling methods: The open design means I’m not constrained by space. I’ve tested both air and water cooling setups without a hitch.
Support for a range of power supplies: Whether you have an ATX or SFX power supply, this case can handle either. It’s great for not having to invest in a new power supply if you’re transitioning from an older build.
My queries revolved around the practicality of its everyday use. The lack of front panel USB ports is a drawback, and for those without additional components like PCIe USB ports, this could be a point of contention. The GPU bracket also gave me a pause for thought; it should have been designed more robustly to handle the weight of the modern heavy GPUs, especially for vertical mounting.
Another potential downside is the assembly time. If you’re after a quick setup, this might not be for you. However, once completed, I admired the sturdiness of the aluminum frame. It was light enough to move around but solid enough to hold all my gear securely.
Here’s what I found brilliant about this test bench:
Thoughtful inclusion of a handle for portability
The open chassis contributed to excellent heat dissipation
The flexibility in setup – it was like a grown-up’s Lego set for PC enthusiasts
Extra hardware and tools included, which is always a welcome bonus
While there is a steep learning curve to get everything assembled and customized to my liking, it was a rewarding experience. Each obstacle I overcame, like aligning the motherboard standoffs or figuring out the cable management, added to my personal sense of achievement.
Overall, this case is great for a user like me, someone who enjoys the process as much as the result. It’s ideal if you’re constantly swapping out hardware for testing or if you crave that open air aesthetic. Despite the minor caveats, I’d recommend it to others who are in the same boat.